Wednesday, February 29, 2012

Parmesan Zucchini Bites

I love pinterest for many reasons--I can save all kinds of pretty pictures, interior design inspiration, crafts, and recipes. And I have another reason to love it because the site gave me the inspiration for this zucchini bites recipe. When I first came across zucchini bites, I thought they looked like a healthy, yummy snack. I was not prepared for how absolutely divine these things turned tasted. They're just as addictive as potato chips but so much better for you. Plus, they're super easy to make.


Ingredients:
2 medium zucchini
1/2 tablespoon olive oil
1/2 tablespoon butter, melted
1/4 cup grated Parmesan cheese
1/4 cup Italian bread crumbs
1/2 teaspoon garlic powder

Directions:
Preheat the oven to 450 degrees. Spray a baking sheet with cooking spray and set aside.

Slice zucchini into rounds with a quarter inch thickness. In a bowl, mix the olive oil and butter then toss with the zucchini pieces. Combine the Parmesan, bread crumbs, and garlic powder in a shallow bowl. Dip the bites into the cheese mixture, coating both sides, and place on the baking sheet in a single layer.

Bake for 25 to 30 minutes or until the zucchini bites have browned and crisped.
Enjoy!

~Krissy

Update!
So I could eat these every single day and never get tired of them. But I have healthified the recipe a bit. I substituted zero-calorie cooking spray for the olive oil and got rid of the breadcrumbs and cheese. So basically what I do now is spray the cookie sheet with the cooking spray, lay the zucchini circles in a single layer, spray the tops of the squash with the cooking spray then season with garlic powder and onion salt, and bake as before. These have been a hit with my family and Eric's. Enjoy!

Thursday, February 16, 2012

An Apple Cider Birthday Cake

Happy Birthday Eric!


Today he turns 26 and I went all out in making his birthday cake this year. Last year I made him a strawberry cake with cream cheese filling and chocolate frosting, decorated with fresh strawberries and candy clay roses. This year it's going to be an apple cider cake with caramel buttercream filling and with homemade fondant.

Apple Cider Cake:
I've been dying to test out this cake forever. Last autumn I got so caught up with making all kinds of pumpkin recipes, I never got around to the apple cider cake. Fortunately, Eric loves apple cider even more than I do, making this the perfect cake for his birthday. However, his birthday doesn't fall in the perfect month for buying apple cider. So I will admit this up front: I used the powdered apple cider mix instead of the real thing in this cake. It still turned out tasty, but I can't wait to make this cake again when apple cider is in season.
Fresh out of the oven
 Ingredients:
1 spice cake mix
1 3-ounce package instant vanilla pudding
4 eggs
1/2 cup apple cider
1/2 cup vegetable oil
1 cup sour cream

Directions:
Mix all the ingredients together in a large bowl, pour into two 8-inch round pans that are greased and floured. Bake according to package directions. Allow the cakes to cool completely.

Eric's mom taught me a cool baking trick today that her mom taught her. Grease and flour your cake pans, then line the bottom with waxed paper. The cake just slides out and then you just peel the waxed paper from the bottom of the cake.

Caramel Buttercream
Ever since we made buttercream frosting for the very first time, both of us have been a little obsessed with it. I don't think we'll ever use store-bought frosting again. So I knew I had to use buttercream on his cake. But I didn't want to make plain buttercream. What goes with apples? Caramel!

But sadly I don't have a caramel recipe for you. I used this Martha Stewart recipe for the caramel buttercream, but I was terribly disappointed in it. While the taste was pretty good--there's got to be better out there though--I wasn't at all pleased with the texture. Not to mention this frosting is a ton of work. So I think I'm going to work on developing my own caramel buttercream recipe.

Anyway, once the cake had cooled I filled it with the frosting then put a thin layer over the rest of the cake so the fondant would stick.

Marshmallow Fondant 
Eric couldn't care less about fondant. As I said, he loves buttercream and would have been more than happy to have his birthday cake covered in frosting. But I was looking for an excuse to make fondant. I don't really like the taste of store-bought fondant (does anyone?), but I've read rave reviews on this basic homemade marshmallow fondant and thought Eric's birthday was the perfect excuse to try it out.

Ingredients:
16 ounce bag of marshmallows
2 tablespoons of water
1/2 tablespoon vanilla extract
2 pounds powdered sugar, sifted
food coloring, optional
shortening

Directions:
Grease a large, microwave-safe bowl with the shortening and place the marshmallows, water, and vanilla extract in the bowl. Microwave the marshmallows in 30-second intervals until the marshmallows puff up and soften, between 2 and 3 minutes. Grease a spatula with shortening and stir until the mixture is well combined. If you want to color your fondant, add the food coloring while mixing. I made mine green.

Now, most recipes I found recommended greasing your hands in order to work the sugar into the marshmallow mixture. I tried this but had better luck when I powdered my hands with sugar. So the choice is yours. Knead the sugar into the marshmallow mixture 1 cup of sugar at time. The more sugar you add the easier this becomes. About 2 cups of sugar in, I moved my fondant to a cutting board generously sprinkled with powdered sugar. All other recipes said to grease you work area with shortening or sprinkle with cornstarch. Powdered sugar worked just fine for me. Once you've worked in all the sugar, the fondant will no longer be sticky. 

I read that the fondant is easier to work with if you let it sit over night, so I prepared it the day before, double wrapped it in plastic wrap and let it sit on the counter overnight. However, you can work with it right away.

When I was ready to cover my cake, I rolled the fondant out with a rolling pin to about 3 or 4 inches wider than the diameter of my cake. To get the fondant on the cake, I rolled it the fondant around the baking pin and unrolled it on top of the cake, then trimmed the edges (I used a pizza cutter). It was a lot easier than I thought it'd be. My biggest problem was that my frosting would not stay on my cake, which caused all kinds of issues with the fondant.

The fondant didn't look too pretty, but it did taste really good. I can't wait to play with it more. Maybe one day I'll be able to make beautiful cakes.
 
I've been watching a lot of Cupcake Wars lately and on the show they are always making decorations by piping melted chocolate on waxed paper, so I thought I'd give it a try too for Eric's birthday. While this was incredibly simple and easy to do, I forgot that I'd need something to adhere the the chocolate to the cake. I had some glittery gel that I used on my gingerbread house last December. But the gel was messy and . . . well . . . put it this way, the cake tasted awesome, even if it wasn't the prettiest cake. Most importantly Eric liked the cake, and that's all that mattered.


Enjoy!

~Krissy

Tuesday, February 14, 2012

Valentine's Day: Cream Cheese Swirled Brownies with a Strawberry Sauce

Source
Valentine's Day is one of those polarizing holidays. People--whether they're single or in a relationship--either abhor February 14th or absolutely love all that it stands for: the hearts and cupids, doilies and doves, chocolates and flowers. Valentine's Day has a reputation as a commercial, Hallmark holiday. It may have become just that, but it has legitimate roots. It was first established way back in 496 AD by Pope Gelasius I to honor Saint Valentine. However, there are 14 Saint Valentines. The one celebrated on February 14 may refer to Valentine of Rome, a Roman priest who was persecuted and killed around 269 AD; Valentine of Terni, a bishop who was killed under the persecution of Emperor Aurelian; or a possible third, mysterious Valentine martyred in Africa. Since no one was sure which Saint Valentine was being honored, the feast day was removed from the Catholic calendar in 1969 by Pope Paul VI.

Geoffrey Chaucer
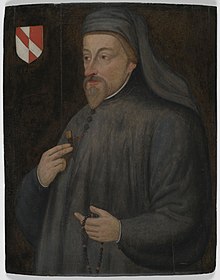
So far nothing very romantic. It was Geoffrey Chaucer who imbued Valentine's day with romantic love when he wrote Parlement of Foules in the 14th century.

"For this was on Saint Valentine's Day,
When every bird cometh there to choose his mate"


Source
Flash forward to the 15th century: Valentine's Day has become a day for couples to show their love for one another by giving flowers, candies, and cards--the same traditions we follow to this day.

Source
While I like the idea that the author of The Canterbury Tales gave us Valentine's Day as we know it, Eric and I mostly use the holiday as another excuse to indulge chocolatey goodness. This year Eric (who is sick, the poor guy) gave me some delicious Ghirardelli chocolates and I made him cream cheese swirled brownies with strawberry sauce. 

Yesterday I wrote about doctoring cake mixes. Today I doctored a Ghirardelli brownie mix by adding a cream cheese swirl.

Brownie Ingredients: 
brownie mix
ingredients called for by the mix (eggs, oil, water)
1 8-ounce package of cream cheese, softened
1 tablespoon powdered sugar
1 tablespoon milk

Directions:
Prepare the brownie batter according to package directions, pour into a baking dish, and set aside.

In a medium bowl blend the cream cheese, powdered sugar, and milk on medium speed with a mixer. Scoop large spoonful of cream cheese mixture into the brownie batter. With a spatula, swirl the cream cheese throughout the batter.

Bake according to package directions. With that said, my brownies needed 10 more minutes than the package said. It may have been the brand cake mix or the added cream cheese, so keep an eye on your brownies as they bake.

cream cheese swirl brownies

Strawberry Topping Ingredients:
3 cups strawberries
1/2 cup granulated sugar
1 tablespoon cornstarch
1/2 cup water
1/4 cup orange juice
1/4 cup brandy, optional

Directions:
Mix sugar and cornstarch together in a saucepan. Stir in water and orange juice. Cook over medium-high heat, stirring continuously, until the mixture thickens. Add strawberries and bring to a boil. Reduce the heat to a simmer and cook for approximately 10 minutes. Remove from heat. Add the brandy and flambé. Spoon over brownies.

strawberry sauce

flambé
flambé in the dark

Happy Valentine's Day and Enjoy!

~Krissy

Monday, February 13, 2012

Doctored Cake Mix Ideas

While I bake cookies, pastry, and candies from scratch, I have yet to bake a cake from scratch. I'm sure I will someday. But for now, I doctor pre-packaged cake mixes to make them more moist and increase their flavor, so they almost taste homemade.

Caramel cupcake with chocolate butter cream and sprinkles

Doctored cake mix recipe for a more moist cake:

1 box cake mix
1  3-ounce package instant vanilla pudding
1/2 cup water, milk, or buttermilk
1/2 cup oil or melted butter
4 large eggs
1 cup sour cream or plain yogurt

Simple mix all the ingredients together and bake according to the package directions. Some cake mix batters come out thick like brownie batter, other brands come out normal. I don't know why this is, but if your batter is thick don't worry, your cake won't come out super dense.

How to add more flavor to your cake mix:
If you want to play with the flavor of the cake, exchange the vanilla pudding for a different flavor such as chocolate or banana. You could also use a flavored yogurt such as cherry or lemon. Or add a splash or two of an extract. Personally, I usually substitute the 1/2 cup water/milk/buttermilk with a flavored beverage. You can use soda pop--think Cherry Coke--or fruit juices. I love using liqueurs. When I was in the Caribbean almost four years ago I picked up a bottle of raspberry-chocolate rum. God, how I loved using it in my baking (and adding a little to my hot chocolate) and am so sorry that it's all gone.

This week, along with Valentine's Day, is Eric's birthday. I will be making a Valentine dessert and a special doctored birthday cake for him and testing out some new decorating ideas. I'll share the outcome with you sometime this week.

Enjoy!

~Krissy

Cinnamon-Almond Meringue Cookies

Opps, I almost forgot to post this recipe. Christmas is long past us, but here is the very last 2011 Christmas cookie I baked.

Since we gave away at least 85% of all the Christmas cookies and candy I made, Eric was complaining that I made all these delicious things and he didn't get to eat any of them (or not as much as he'd like). Being the sweet and loving girlfriend that I am, I made some cookies just for him.

Meringue cookies had almost made it on my holiday baking list. I had it narrowed down to two different recipes I wanted to try, both from the Food Network: one by Emeril Lagasse and the other by Anne Burrell. While I had all I needed to make a basic meringue cookie (eggs white and sugar), I didn't have all the ingredients for either recipe, so I combined the two recipes and worked with what was in my pantry. The results were delicious.

Two-toned meringue cookies
Ingredients:
2 large egg whites, at room temperature
1/2 teaspoon cream of tartar
2/3 cup sugar*
1 teaspoon almond extract
3/4 teaspoon ground cinnamon
red food coloring, optional
green food coloring, optional

*I used granulated sugar because it was all I had in the pantry. Emeril's recipe calls for caster (superfine) sugar, which I would highly recommend.

Directions:
Preheat oven to 350 degrees. Line two cookie sheets with waxed paper.


Mix the sugar and cinnamon together in a small bowl; set aside. Set your hand or standing mixer to the second highest speed and beat the egg whites on high until they become foamy, then add the cream of tartar and beat until fluffy. Gradually add the cinnamon-sugar, 3 tablespoon at a time, continually beating the mixture. When about half the sugar remains, add the almond extract. Slowly add the remaining cinnamon-sugar. Beat is shiny and forms stiff peaks (be prepared; it takes away).

Optional: To make my cookies Christmas-y, I add food coloring. Divide the batter into do bowl. Beat red food coloring to one bowl and green food coloring to the other.

Place a tablespoon of the batter on the wax-lined cookie sheets, spacing the cookies an inch apart. Turn off the oven and place the cookie sheets in the preheated oven. Leave the cookies in the oven overnight, 6-8 hours.


To make two-toned cookies like I did. Spoon about a teaspoon of the red meringue onto the cookie sheet then about a teaspoon of green meringue next to it so the two teaspoon touch.

Enjoy!

~Krissy